
Just about every form of modern construction uses drywall. So when it comes time to place that heavy picture or hang an object on the wall, what type of drywall anchors should you select? If you’re like me, you go to the hardware store, and there are many different options. Each option includes different weight ratings. So, are these weight ratings accurate? Also, how much damage does each of these types of anchors cause? If you’re like me, at some point, you may want to move out of your home, and you don’t want a lot of repair work to do. Also, how much damage will it cause if that drywall anchor fails? Let’s get the testing underway and see which one of these drywall anchors is the best.
Go ahead and buy the best one from this test, or enjoy the review……

To get accurate test results, I wanted to ensure that we start with brand-new drywall that’s never been exposed to moisture. I also ensured that the drywall we used came from the same stack. I then cut out all the test pieces we’ll use today. We’re about to do a lot of damage to some drywall. Now, each sample of drywall is 16 inches by 16 inches. I chose 16 inches because, inside the wall of your home, there will be a 16-inch span between the studs. Also, there’s an X on each sample. We want to test from the center of each piece of drywall to ensure we get accurate test results.
Each test sample is attached with 12 drywall screws in approximately the exact location to make sure this stays secured. On the back side, you can see the test sample. I used two-by-fours, and the drywall is very securely attached. This frame is not going to move. I’m going to secure this frame inside my test jig. We’ll apply force once it’s in place until each drywall anchor fails.
I’ll insert the test piece into the holder to test the drywall anchors. Each piece is held in place by four pins. Once the test piece is in place, I’ll insert the drywall anchor into the test sample and the puller into the drywall anchor. We will apply force until the drywall anchor begins to move, which constitutes failure.
The first thing we’ll be testing is the EZ Ancor drywall and stud anchor. It’s designed to hold up to 50 pounds. Use a Phillips screwdriver, place it against the wall, and begin twisting. Now, you don’t want to overtighten these. Also, the weight rating of 50 pounds is designed for half-inch sheetrock, which we’ll be using today. Trying to figure out exactly when movement occurred took a lot of effort with the video editing software that I use, and it’s subject to interpretation.
Near the end of this video, I’ll provide two charts. In our first test, one chart shows the weight when the movement began, and the second chart shows the weight required to cause catastrophic failure.
The Toggler type of high-performance anchors is rated for 675 pounds in concrete or 69 pounds in the half-inch thick drywall. A quarter-inch drill bit is needed for installation. Once the screw is inserted, the anchor expands, locking it into position. Compared to the first drywall anchor we tested, this type leaves less damage when it fails.
It’s rated for 479 pounds in half-inch drywall. The Toggler high-performance snap screw is a self-drilling drywall anchor. Now, this is sort of a combination of the first two that we used. This one expands and is set up like the first metal drywall anchor we tested. You press the tip of the snap screw anchor into the drywall using a number two Phillips screwdriver or screw gun. Drive the anchor clockwise into the drywall until the anchor stops flush with the outer wall surface. Place an item over the anchor and insert any fully threaded screw. Tighten the screw flush with the item. A popping sound indicates correct installation. So, when this type of anchor fails, it leaves a lot of damage.
Next, we’ll be testing hollow wall anchors. These are rated for 85 pounds. When this anchor fails, it causes quite a bit of damage.
These are toggle bolts from Blue Hawk designed for drywall and concrete. You’ll need a 5/8-inch drill bit to drill the hole in the wall. Next, you’ll install the toggle through the hole, and then you’ll tighten it. So, there’s a lot of damage. It takes a large hole to begin with, and then, as it slips, it tends to tear away.
The EZ Anchor drywall toggle anchor is rated for 400 pounds. It’s self-tapping, so the toggle pops out once you drill it into the wall. Then, you tighten the screw, and the toggle tightens against the wall.
The Toggler high-performance anchor, the Snap Toggle BA, is rated for 238 pounds in drywall and 802 pounds in concrete. It also has a wide range from 3/8 of an inch to 3 and 5/8 inches. This is designed for drywall, tile, concrete block, plaster, and more. There are five different steps:
Step one is to drill a 1/2-inch diameter hole. Hold the metal channel alongside the plastic straps. Hold the ends of the straps between the thumb and the forefinger and pull towards you until the channel rests flush behind the wall or ceiling. Pull back and slide the plastic cap along the straps with the other hand until the cap flange is flush with the wall or ceiling. Snap the straps at the wall or ceiling by pushing side-to-side, snapping off the straps level with the cap flange, then discard the straps. Place the item over the flange, insert the bolt through the item, and tighten until flush against the item.
The purpose of the following test is to see how much force it takes to pull each one of the drywall anchors directly outward from the panels. So each of these panels will be in a horizontal position, and we’ll apply a force directly upward to see how much force it takes to remove each one of the anchors.
The amount of damage caused by this style of wall anchor isn’t all that bad. It’s about a half inch across, with very minimal damage to the backside of the sheetrock. The damage caused by the second wall anchor is comparable to the first.
Up next, we’ll be testing the self-tapping Toggler. The damaged area is about an inch and a half across and about an inch and a half high.
Okay, we’ll be testing the hollow wall anchors next. The amount of damage caused by these hollow wall anchors when they come loose is very significant. That’s a pretty big hole, well over an inch across and about an inch and a half tall.
So, when removed from the wall, the damaged area caused by this toggle, when removed from the wall, is about two and a half inches tall by two inches wide. This type of toggle is straightforward to install. It has less strength than the other toggle because the sheetrock has less contact area.
That’s a lot of damage, and I don’t think that will buff out. Well, the size of the hole is about two inches tall and a half inch wide. The amount of cratering is about four inches by four inches. This is the strongest of all the anchors we tested. It does an excellent job.
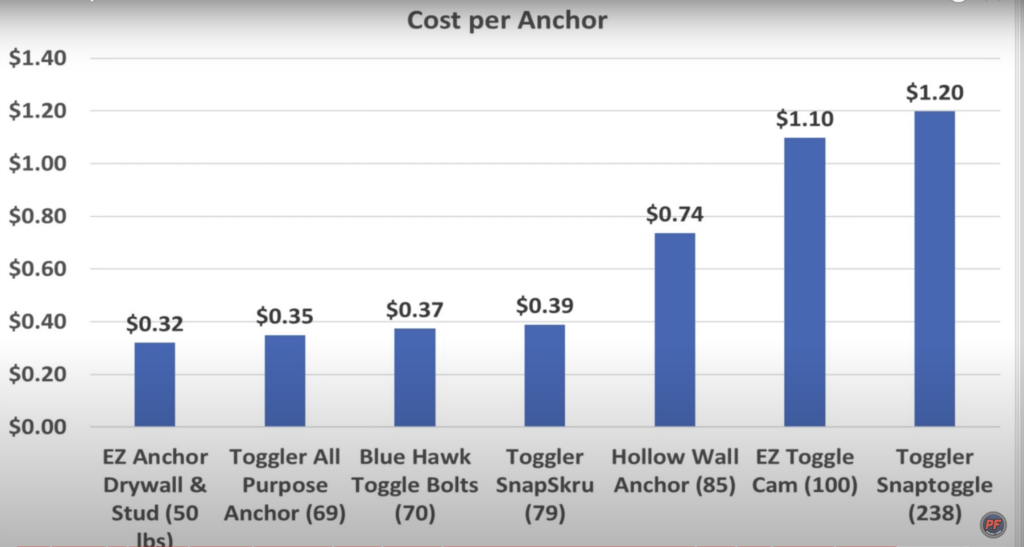
Cost per Anchor
When comparing price, there’s a direct correlation between price and rated weight capacity. After seeing the amount of damage that takes place from the anchor failing and coming out of the wall, it’s probably a good idea to go ahead and spend a little bit more money and buy an anchor that will provide enough strength.
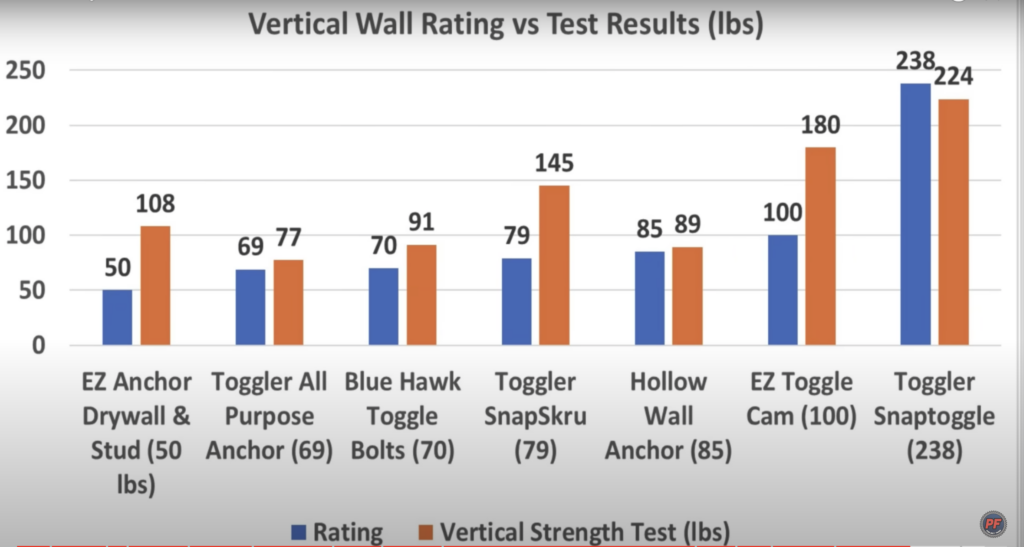
Vertical Wall Rating vs Test Results (lbs)
In the first test, we compared the rating against when the anchor appeared to begin moving within the drywall. Every anchor except the anchor to the right on this chart, the Toggler Snap Toggle, exceeded its capacity. However, the Snap Toggle came very close. Several drywall anchors far exceeded their capacity. Of course, the testing was done under optimal circumstances with a direct pulling force compared to a bracket or shelf that would apply a lot more leverage on each anchor.
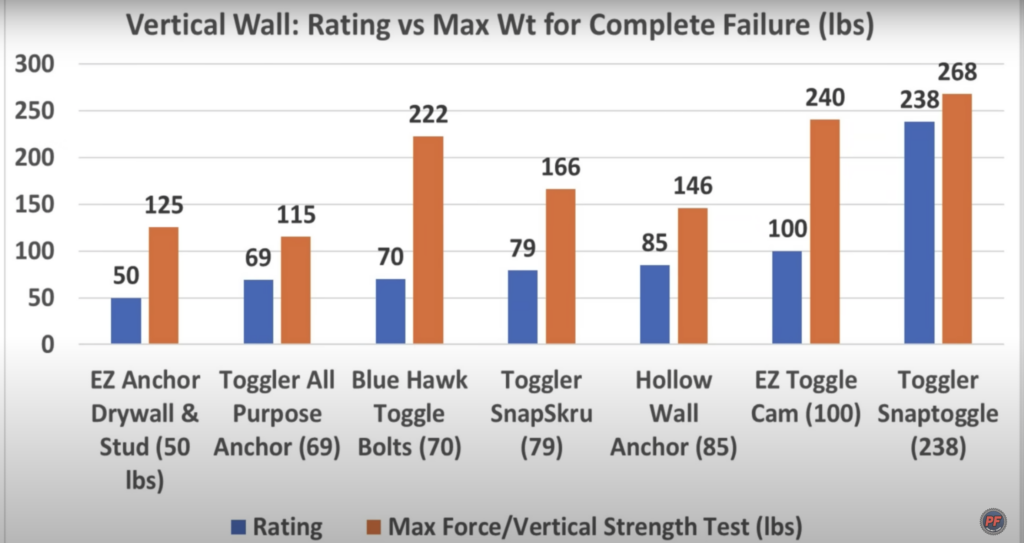
Vertical Wall: Rating vs Max Weight for Complete Failure (lbs)
Even though the anchors began to move, they didn’t experience catastrophic failure until much more weight was applied. In every instance in this scenario, all the anchors exceeded their capacity.
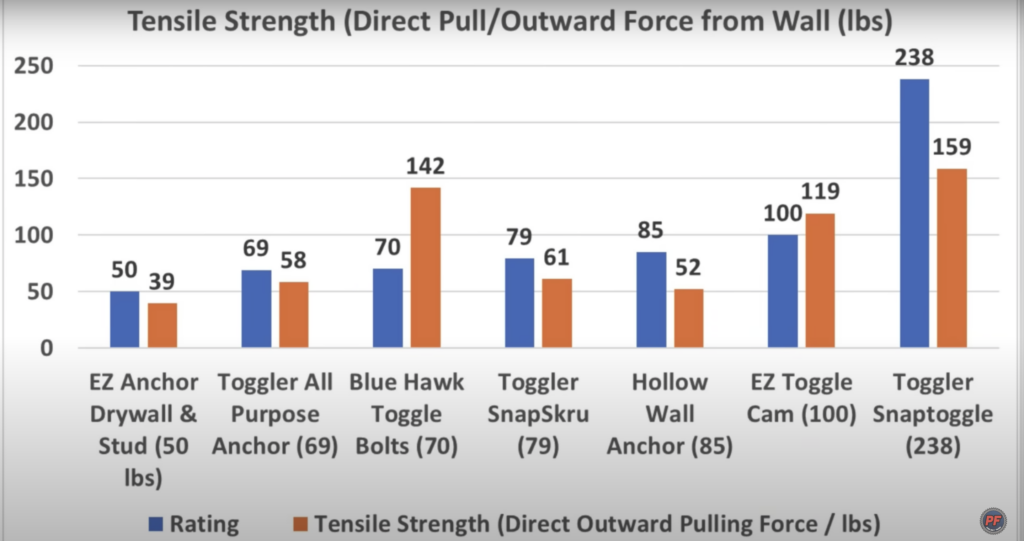
Tensile Strenght (Direct Pull/Outward Force from Wall (lbs)
So if you’re using a drywall anchor for a shelf bracket or towel rack that could experience direct pulling force, this test is very informative regarding failure load. These anchors are not rated for this type of force, but this scenario does occur in the real world. All the anchors did a respectable job.
The Blue Hawk and Easy Toggle Cam exceeded their capacity in this test, which is impressive.
So, after causing a lot of damage to quite a bit of drywall, I finally figured out which drywall anchor I liked the best. I liked the EZ Ancor Toggle. It’s pretty easy to install, doesn’t cost that much money, and has a lot of strength. While some of the anchors cost a little bit less, they also cause just as much damage during installation and don’t provide nearly as much support. So if that drywall anchor fails, you’ll have some sheetrock repair work to do, which I don’t like doing.

I have a lot of fun doing these tests. As a reminder, I’m not sponsored by any of these brands. I buy all the products for testing with my funds. I want to say thanks so much for reading this test. If you have any test ideas, please let me know. 100% of my tests are reader-recommended, including this one. So thanks so much for recommending this test. Please take care, and I look forward to next time.
Leave a Reply