
Lansky, Wicked Edge Gen 3 Pro, Spyderco, Fiskars, Rada, Chef’s Choice Trizor Edge Model 15XV, Edge Pro Apex, and a Whetstone.
Knives used for testing: Mercer Culinary Millennia 8-Inch Chef’s Knife was dulled, then sharpened using each knife sharpener. Stropping leather is used on knives sharpened with Lansky, Wicked Edge, Spyderco, Edge Pro Apex, and Whetstone. Once sharp, knives were tested using a knife sharpness tester.
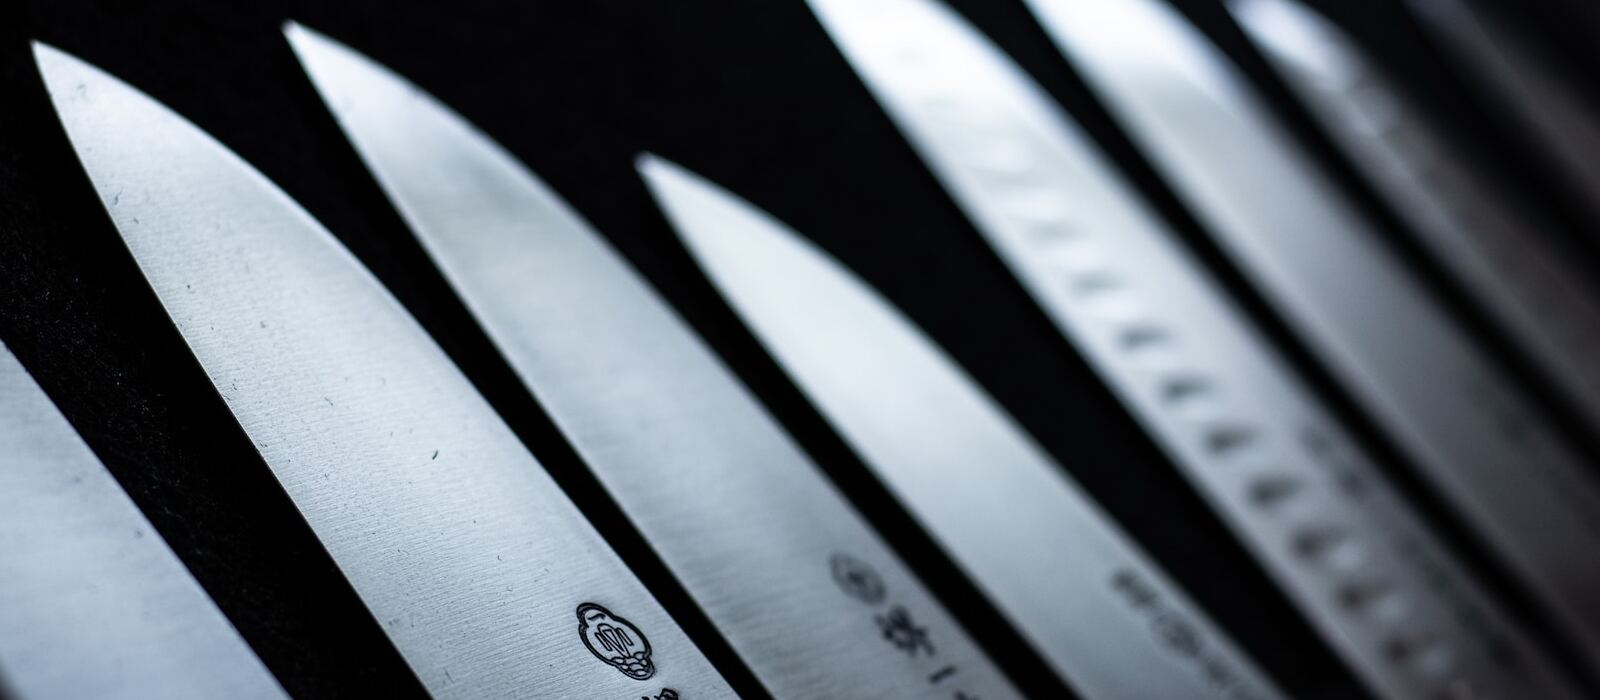
Before we begin with the test, here’s a visual overview of all the sharpeners we used
Lansky:

Wicked Edge Gen 3 Pro:

Spyderco:

Fiskars:

Rada:

Chef’s Choice Trizor Edge:

Edge Pro Apex:

Whetstone:

If you have a nice set of knives, do you want to risk using a cheap knife sharpener, or should you buy a much more expensive one? Many viewers told me that a $18.00 knife sharpener would outperform a $1100 knife sharpener.
I don’t know if it will, but we’re about to find out and will also be testing several other high-quality knife sharpeners. So let’s get the testing underway and see which one is the best.
I’ll use these 8-inch high-carbon stainless steel Chef’s knives for knife sharpness testing. In this test, we’ll see if the knife sharpeners can make a butter knife razor-sharp.
I’ll use this best-certified sharpness tester to measure the sharpness. The way this works is that I’ll be using these test clips. A piece of test media runs from the test clip’s left to the right side.
As a knife edge pushes downward, the scale measures the downward force in grams applied to cut through the test media. So, a double edge razor blade is around 50. A utility blade is anywhere from around 150 to 200.
A new high-end cutter for each edge is anywhere from 250 to 350. Edges that need maintenance are around 400. A butter knife is around 2000. Let’s first look at the blade condition under a microscope for dulling the knife blades and then measure the blade’s sharpness.
Before we duel this blade, let’s go and get our baseline sharpness. Wow, 145, that’s as sharp as a razor blade. So knife sharpener says this thing is sharp; let’s test it out to see how sharp it is. Yeah, that’s pretty sharp.
To dull the knives in a standardized process, I put together this test rig. The way this works is that the platform remains in a stationary position while the rest of the device is going to slide backward.
As a knife slides backward, it will go over the top of an object, which will cause the blade to dull. We will be sliding all knives across this aluminum pipe five times to dull the blades.
I’ll apply two and a half pounds on the knife. The aluminum pipe did much damage to the knife edge, which will put each sharpening system to the test.
The knives all started at 145, extremely sharp, so let’s see what damage we did to the blade. Okay, 1825. 2000 is a butter knife, so this dull blade needs much maintenance.
Rada
The least expensive knife sharpener we’ll be testing, at only $17.40, ‘s this Rada knife sharpener, made in the USA and reinforced with a non-slip base for extra durability rivet. This assembly provides perfect tolerance and flex between sharpener wheels for optimal sharpening performance.
I will use a permanent marker on each blade to see how effective each sharpener is at sharpening the knives. Clear instructions place the knife blade between the two sharpening wheels and, using light pressure, pull through at a slight upward angle and repeat several times.
You can tell there’s much damage to this knife’s edge because of all the shavings this Rada knife sharpener takes off.
Fiskars
At $21.50 is this Fiskars essential roll sharp knife sharpener—quality since 1649, designed by Fiskars made in Finland.
The most important part of the Fiskars roll sharp is the patented rotating wheel made of a unique ceramic material that grinds away any dents or burrs from the edge of your knife, producing a safe sharp edge.
Whetstone
So why spend a lot of money on a knife sharpener when you can buy a whetstone for about $13? Start with 400 grit and then use 1000. Well, first, add a little water to the stone. Getting good results with a wet stone will likely vary based on a person’s experience and skill level using the sharpening system.
I have quite a bit of experience using abrasives. I need to gain experience in using a whetstone for sharpening knives. Many knife sharpeners leave it to burr on the edge of the blade. A stropping leather and rubbing compound removes the burr and cleans up the freshly sharpened edge.
I applied a total of ten strokes to each side to remove the burr for each one of the sharpeners that are designed to benefit from honing.
Lansky
At $87 is this Lansky brand sharpener. It controlled Angle Sharpening System, Deluxe Diamond, made in the USA.
Knife clamp with angle sensor, four guide rods for sharpening stones attaching knife blade loosen the front screw for full turns with a dimer screwdriver. Only tighten the rear thumb screw using your fingers and then loosen two full turns.
Place the knife in the clamp’s jaws, and pinch the clamp’s jaws with your hand while tightening the front screw. Fully tighten the rear thumb screw to lock the knife in place. Assembling the hone, place the hone stone side down on a flat surface. Unscrew the wing screw and feed guide rod from the bottom up.
Ensure the hone and rod are flush with the flat surface using finger pressure only. Tighten the screw on the phone holder to hold the rod securely. Check straightness and alignment with the hone against a flat surface. Be sure the rod and honing stone touch a flat surface along the entire length.
If the rod is not level with the stone, bend it into alignment using light finger pressure. With the Lansky, you can choose 17, 20, 25, and 30 degrees. I go ahead and choose 17 degrees. Beginning with the coarse stone, insert the guide rod into your selected angle hole.
Start at the knife base near the guard and place the hone against the edge; push the hone against the edge into the blade while moving the hone towards the tip of the blade, covering a two-inch section of blade per stroke. Sharpen one side first, flip the entire clamp over, and sharpen the opposite side using the same number of strokes.
Spyderco
Costing $87 is the Spyderco triangle sharp maker: USA-made instructional CD, paper instructions, and two fine and medium sharpening stones. With two safety rods, the Spyderco has two different angles, 30 degrees, and 40 degrees. I’m going to sharpen using 30 degrees.
Step 1 is shaping; use the corner of the gray stone to shape an edge or set an angle as it cuts the fastest. When sharpening, press hard enough to remove the metal. Always keep the knife blade straight up and down. Always sharpen the entire blade from heel to tip, drawing the blade towards you as you slice down the stone. You have 20 strokes on each step, alternating between right-left stones for 40 strokes.
Step 2 is utility; use the flat stone of the gray stone to produce a utility edge.
Step 3 is honing; use the corner of the white stone to produce a very sharp edge.
Step 4 is a razor; use the flat surface of the white stone to produce a razor edge as it’s very fine.
Chef’s Choice
Costing $115 is this Chef’sChoice Trizor Edge model 15 XV assembled in the USA.
Stage 1, turn on the power and pull the length of the blade through the left slot and then through the right slot. Using the left and right slots on alternate pulls takes about three or four seconds of each pool for a 5-inch blade.
The first time you sharpen a European or American knife, it may take up to 20 pairs of pulls to fully reangle the edge of a thin blade. Thicker blades will require more pulls.
Stage 2, honing in, make about one or two pairs of pulls through stage two, alternating each in the left and the correct slots. Take about three seconds for each pull on a five-inch long blade; check for a burr before proceeding.
Stage 3 stropping edge in stage three pulls the blade through the left slot of stage three and then through the right slot of stage three. Make three pairs of poles alternating the pull in the left and the correct slots.
You should take about three to four seconds for each pool for a five-inch long blade. Then make two pairs of alternating faster pulls in this stage, about one second per pool for a five-inch blade to put a final polish on edge.
Edge Pro Apex
Costing $285 is, this Edge Pro Apex 4 made in the USA. This is the body of the sharpener. 120, 220, 400, 600, and 1000 grit sharpening stones 2000 and 3000 grit polish tapes.
Setup instructions:
Step 1, stick the suction cups down and dry them onto a smooth, non-porous surface. Remove the stone arm from the case and remove the rubber band. Rotate the pivot so that the pivot shaft is on your right. Insert the pivot shaft into the back of the apex with the indicator marks facing you. To set the angles, aline the top of the pivot with the arm of the indicator mark.
Place the pivot lock knob in the center of its slot and tighten it. 220-grit This is a stone you will start with on most dull knives. Changing stones, the stone is held in place by the tension of the spring. Put the knob in the palm of your hand. Wrap your index and middle finger around the back of the large holder with one finger on each side of the steel rod.
Squeeze to compress the spring, and the stone will release. Since we’re using Japanese cooking knives, we will sharpen them to 18 degrees. This sharpener can sharpen at 10, 15, 18, 21, or 24 degrees. Put enough water on the stone to cover the surface and let it sink.
Step 2 flexible blade; position the blade on the blade table with the knife handle near the blade table and the edge parallel to the front of the knife guide.
Step 3, stiff blade Center the knife across the blade table and place the stone on the knife’s edge. Pull the knob all the way around towards you and slide the stone over the blade’s heel.
Step 4, the strop pushed a stone arm forward and, at the same time, let it slide to the opposite side of the blade table, making about a two-inch wide cut. Pull the stone arm back to the starting position along the same path with each stroke. Apply just enough pressure to get the stone to cut.
Most of the sharpening is done during the push stroke. Don’t pick the stone up on the pull stroke. Just let it slide on the edge. Make smooth long slow strokes that can bump the stops gently.
Step 5, hold the knob and loosen your hands so it is free to follow the shape of the knife blade. Draw the blade across the blade table and make three or four push-and-pull strokes starting at the knife’s heel. Stop sharpening. Move the knife one inch and make three or four strokes. Continue this manner until you reach the tip of the blade.
Step 6, twist the knife and the stone arm into the opposite hands and repeat the process on the opposite side of the blade.
Step 7 brings the edge to a burr and continues making equal passes down the side of the blade. Check the knife for a burr each time you switch sides.
Step 8 is to remove the burr, 400 grit use this stone to start sharpening knives that are in pretty good shape. 600 grit, this can be your finished stone on most kitchen knives. 1,000 grit is also a finished stone for kitchen knives, and the next step towards polish: is 2000 and 3000 polish tapes.
Use to finish the edge of all sporting and pocket knives and Japanese cooking knives. This is the strongest and the longest-lasting edge you could put on a knife.
Wicked Edge Gen 3 PRO
Costing $1100 is this Wicked Edge Gen 3 Pro. You can easily adjust the angle by moving this lever. We’re going to be sharpening it to 17 degrees.
Step 1 Attach your guide rods to the ball joints by threading them into the rod ends.
Step 2, attach the number 4 vise lever to the sharpener by sliding the square hole on the vise lever block onto the square camshaft towards the bottom of the number one vise. The lever should be attached to the right of the number 1 vise.
Step 3 Place your sharpening stones onto the number-9 shells for easy access while sharpening. Mounting your knife, attach the number 10 alignment guide to the number 3 depth key and insert the two prongs of the depth key into one of the two number two depth settings located at the top of the vise while firmly holding the knife with one hand lift the vise lever into its resting position.
The vise level should now be vertically parallel to the vise. Push the vise lever all the way down to the right side of the sharpener. Mark the entire angle of the knife on both sides with a marker. Slide one hundred 200-grit diamond stone handles onto the guide rods.
Place the top of the red 100 coarse grit stone flat against the knife’s heel. Grasp the handles with your fingers on the indentations being careful to keep your fingertips behind the guards to which the stones are mounted.
Creating and detecting a burr; when you first sharpen the blade, successfully drawing a burr from each side of the knife is an essential step. Do approximately ten strokes on only one side of your knife, and then check the opposite side for a burr. Once you’ve successfully created and detected a burr on one side of the knife, repeat this procedure for the other side.
Use alternating side-to-side strokes of both sides of the knife that are sharpened simultaneously. Sharpen until the marker is completely removed from the angles.
Progressing through your stones, once you’ve successfully created and detected a burr from both sides of the blade, sharpen your knife using alternating side-by-side strokes. Progress through your abrasives until you achieve the level of polish desired.
Before we test the sharpness of the Rada, let’s take a close look at the sharpened blade. The Rada has worked on about 20% of the original ground knife edge.
All the knives started at 145, and we’re dulled quite a bit. So we will see how well these knife sharpeners performed—starting with Rada. While the knife started at 145 and then dulled to over 1,800, the Rada returned the edge to 230. According to our sharpness chart, 230 is considered very sharp for a kitchen knife.
Like the Rada, the Fiskars did an excellent job cleaning up and straightening the knife’s edge. It went to work on about 20% of the original blade edge. Testing the Fiskars, 230 is equally sharp and very impressive.
The marker helped me figure out the correct angle for sharpening with the Whetstone, which looks terrific. But is it sharp? We’ll see how well I did with the Whetstone. I am NOT an experienced Whetstone user, so this will be very interesting. Whoa, a 120! Boy, that’s sharper now than where we started. Unbelievable.
Lansky cleaned up the damaged blade, putting a beautiful edge on the knife. 110! That’s amazing; 110 is the number to beat.
The Spyderco edge looks sharp and is close to the original angle. 170, that’s still very impressive.
The blade edge, made by the Chef’s Choice Trizor Edge, looks very good. 190 is very good, but not the best.
The pro apex 4 blade edge looks sharp; 170 is very impressive. Though the edge blade seems to fit this sharpener, is it as sharp as it looks? 100 unbelievable, this thing is scary sharp.
Let’s see how sharp this thing is regarding shaving hair; wow, this thing is razor-sharp.
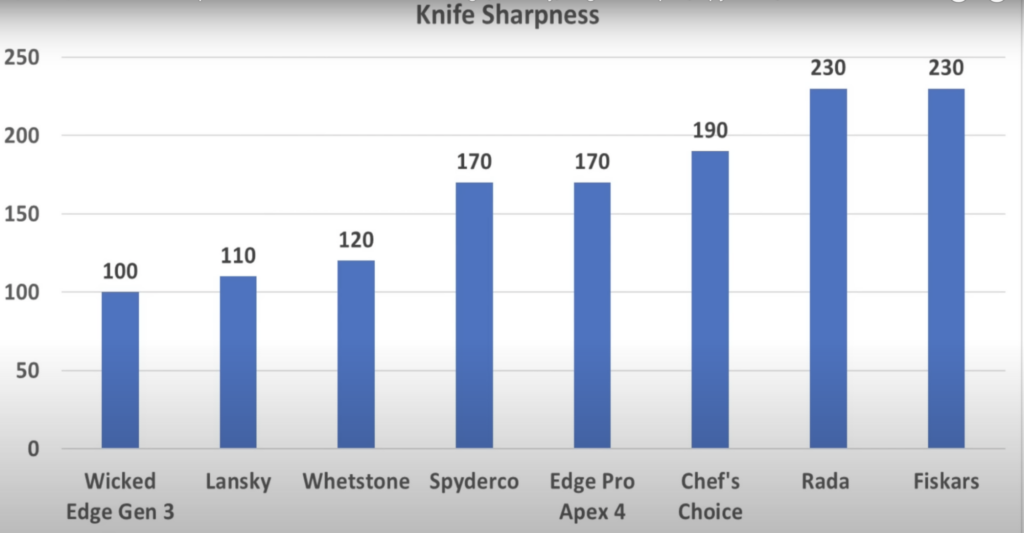
Knife Sharpness
So $1100 Wicked Edge Gen 3 Pro came out on top but not by much as a very affordable $87 Lansky came in second and the Whetstone third.
Chef’s knives are often used on cutting boards, so we will simulate using this chef’s knife on this cutting board which is a piece of Ironwood.
Now Ironwood is a tough piece of wood that will put each of the blades to the test. We’re trying to determine whether certain knife sharpeners create a more durable edge than others.
So we will begin with the Rada, work our way through all the knives, and make 30 back-and-forth passes across the Ironwood. The Rada started at 230 and is now at 290, still very sharp.
The Fiskars did slightly better at retaining its edge at 280. the Whetstone started at 120 and did a great job retaining its edge at 150. the Lansky started at 110 and remained very sharp at 185.
The Spyderco started at 170 and struggled at over 500. the Chef’s Choice Trizor Edge started at 190 and did a great job at 225. the Edge Pro Apex started at 170 and did very well at 220. the Wicked Edge Gen 3 Pro started the sharpest at 100 and remained the sharpest at 140.

Knife Sharpness (After Use on Ironwood)
Highly sharp knives are usually more at risk for blade edge roll and dulling. But the Wicked Edge Gen 3 Pro remained sharp after 30 back-and-forth passes on the Ironwood. The Whetstone held up exceptionally well, finishing in a close second, and the Lansky third.
While the rest of the brands didn’t return knives to their original level of sharpness, some came very close. All the Spyderco did an excellent job sharpening the blade edge. Using the sharpening rods instead of sharpening stones caused an issue with blade edge fatigue.
However, this could be my fault and not the sharpening system. In the previous test of knife sharpeners, many of you suggested that a low-quality knife blade cannot be very sharp. This knife has already been dulled. Let’s see how dull it is, and then we’ll see if we can bring it back with the Wicked Edge Gen 3 Pro since the Wicked Edge Gen 3 Pro won this showdown as far as original sharpness.
Okay, 1390, this thing needs much maintenance; the cheap steak knife blade edge looks good after sharpening, but is it sharp, let’s? See how well the Wicked Edge Gen 3 Pro did on this cheap steak knife.
85 Wow, this thing is extremely sharp. Since a butter knife is exceptionally blunt, I will use the Chef’s Choice Trizor Edge, which did well in this showdown. At 190 sharpness to see what it can do with this butter knife. It took around 30 minutes to put an edge on this putter knife, but the Chef’s Choice Trizor Edge sharpener held up well.
And the butter knife blade looks great, but is it sharp? See how the Chef’s Choice Trizor Edge did with this butter knife. That’s pretty sharp for a butter knife. I’m impressed. Let’s see how our butter knife is doing 160; wow, this thing’s incredibly sharp.
Conclusion
For a $17.40 knife sharpener, the Rada did well. The Wicked Edge Gen 3 Pro did a fantastic job at $1100, which is a lot to spend. And if you’re not up for spending $1100 and want some stone or diamond sharpener. Lansky is an outstanding value and my choice.
All my test ideas, including this one, come from readers, so I hope you’ll take the time to leave a comment. I read and replied to as many comments as possible. Thanks so much for reading the test. Please take care, and I look forward to next time.
Leave a Reply